Showing posts with label RoomByRoom. Show all posts

Sunday, 22 November 2015

Room by Room - Bedroom

I have a small bedroom - which can be seen in the Before and After posts from organizing my bedroom. The biggest difference for me was changing the paint colour and reconfiguring the layout. I also decided to replace the clunky old furniture with items that fit better in the space.
 
 
Another thing I did was take advantage of old furniture by taking the upper drawers of my old dresser and utilizing them as under the bed drawers. If you look closely, you can see the handles under the bed. If I had the floor space, I would have used the larger drawers and made storage crates like the ones seen in the picture below. 
 
 
You can also optimize under the bed storage by making your own bed platform using cube shelves. This way you can optimize under the bed storage space and create a fantastic bed frame.
 
 
You may also notice in the photo of my bedroom, that the side table is a chest. I decided to use the chest because it served as storage as well as a table and a conversation starter. Originally the chest was lined with painted paper and smelled old. To see how we transformed the inside to maximize storage a practicality, visit the Revamped Chest post.
 
 
To optimize floor space, you could get your bed off the ground with a loft bed. That way you can use the newly found floor space to create a walk in closet or an office space.


Another great way to optimize space is taking advantage of your closet space. Visit our posts Organizing your Closet and More Closet Organization for tips and tricks to maximizing your closet storage.
 
 
I also took advantage of the space under my dresser and built a nice wood box to store extra items. For us it was toilet paper because I moved our toilet paper cupboard from our bedroom to the front hall for our shoes. We built this drawer the same way we made the insert for our chest. See Revamped Chest for more details.
 
More ideas to come! Which is your favourite?

Room by Room - Office

Whether your office is in a separate room or part of you general living space, keeping it organized can help keep your home looking clean and spacious. My office space happens to be in my living room. I have designated a specific area for office related tasks but unfortunately their just isn't enough space. For this reason, it is important I keep it organized.

As mentioned in my post about organizing your living room, I plan on building a table to go behind my couch that has a hinged expansion so that the couch table will turn into an extra workspace for homework and crafts. This way, the couch table will serve two separate functions in my shared room! If you need extra work space, take a look around and see if there is anyway to use your furniture, or create furniture that can serve multiple functions.


I also found an idea for organizing paperwork. By dividing your papers by purpose or task you can quickly sort documents when you get them. Once it is full, or you get a chance to empty each bucket, you can do it quickly. You also don't have to worry about piles growing on your workspace, taking up valuable area. I would probably include a folder for filing and mailing. 


My favourite addition to my office area is my "Useful Box" organizer. I got it as a gift from a friend but have also seen them at Walmart. It provides several compartments that are perfect for storing staples, paperclips, USB drives, erasers, binder clips, push pins and really any other small trinket you can think of. You can easily see into the box and grab what you need in an instance. It could also be used for craft supplies if your office doubles as a craft room.

 
I love the idea of making this giant chalkboard calendar. It would be pretty easy and would only require tape, paint brushes, chalkboard paint and a little time. It makes it easy to see what you need to do at a glance and is a fun way to spice up your office.


Instead of throwing all of your office supplies in your drawer, use drawer dividers or small boxes and trays to keep everything organized.

 
Try a little organization DIY by turning a shoebox into a charging station. It helps keep everything looking tide by tucking away your cables. Be careful not to create a fire hazard though!

 
I hope you enjoyed these tips. Keep an eye out for more!


Room by Room - Living Room

I am about to organize my living room to make it more functional.
 
The first thing I read was that before anything, consider what you do in your living room. The article made a good point. It said that even though you may not think that certain items, such as toys and LEGOs, belong in your living room, if they end up their during your family's living, it may be time to find them a home in the living room. They suggested storage ottomans.


Create a place for current projects. Instead of leaving half completed works of art sprawled across the table, you can designate a place where they will be safe until next time. It will help keep your living room clean.
 
 
Create a table to put behind your couch. This creates extra table space and can take the place of clunky side tables. You could also use it as a table, as in the picture. I am going to design one with an additional top width that is hinged on. This way I can make the table bigger when I need the space - such as for homework and crafts, but can easily make it smaller when I need the floor space.
 
 
Invest in a quilt rack or a blanket ladder. This will give your throws a home so that they aren't always taking up couch space. If you can't find one, you can always build one!
 
 
I absolutely love this next one but am unable to do it because our couch has funny shaped arms.
This organizer built a side table to go over the couches arm. This saves space by eliminating the need for side tables and it is small enough to find a place for when not in use.


Layout is key to optimizing space. Try setting up your living room in different ways to see which is better. If you don't want to move the furniture around, try making a room layout to test configurations. Visit Apartment Therapy for more ideas.
 
 
Did you find anything helpful? Share your ideas in the comments!


Friday, 20 November 2015

Room by Room - Organizing Your Craft Room

You voted and I listened. Here are some ideas for organizing your craft room - or in my case the craft portion of my bedroom! I have decided to make this into a multi-post topic due to how extensive craft storage can be. This post will help you take advantage of your limited space in general and the following posts will focus on specific areas such as scrapbooking, sewing etc.

To see craft by craft posts visit our Craft Organization section!


Baggies of Every Size - these are my craft storage life line! I have various sizes to use for ribbons, beads, buttons and other embellishments. The dollar stores sell several different sizes. I keep them in a special container or drawer so that they are easy to find.


Pill Organizers - these can be use for the same items you would put in your smaller baggies but can be organized by purpose. You could have a couple designated to sewing and another to scrapbooking and it would make it easier to sort through. My baggies spend much of their time in a pile.


Peg Boards - peg boards are a great. You can get all sorts of hooks, rails, shelves and baskets to hang off of it and reconfigure it whenever you want. You can even stencil the shape of the item onto the peg board so that it is always put back where it came from, no matter who uses it. Learn how to make your own Giant Peg Board!


Use Your Closet - if you aren't using your craft room closet for any other purpose, use it to store your crafts. You can add an organizer or use the basics that are already there. Use every inch including the walls, floor and door.


Add Shelves - take advantage of the vertical space by adding shelves to store your crafts. This crafter used rails with movable shelves which is great because it can change as your inventory changes.


Invest in a Wine Rack - this can be multi-functional. It can store your wine and your crafts. The one below is the perfect size for wool but it could hold fabric, paintbrushes or drawing supplies.


PVC Pipe - if a wine rack isn't your thing, try using PVC pipe. I have even seen crafters use it on their peg board.


Filing Cabinets - these can be used for all sorts of crafting supplies like scrapbook paper and fabric. For a tutorial on how to file your fabric visit The Thinking Closet.


Shoe Storage - use hanging shoe storage to organize items you have a lot of like markers, glue and decorative scissors.


Rails - similar to peg boards, rails can hold a multitude of shelves, baskets and hooks for crafts supplies of various shapes and sizes. They are also great if you have limited vertical space as they take up much less room than peg boards. IKEA has a wide selection.

 
Velcro and Magnet Boards - these can be used to display items as well as store them. It provides an accessible and artistic way to display different embellishments and paints. I once saw a similar storage system for tubes of paint where they nailed binder clips to a board and hung up the paint by pinching the clip onto the bottom of the tubes.
 
 
If you want tips on a specific type of craft, let me know!

Room by Room - Organizing your Closet

My mom always makes fun of me because my house is a mess but my closets are almost always in an orderly state but it doesn't matter what size your closets are, they never seem big enough and keeping them tidy makes them bigger and easier to navigate.

The most straight forward solution is probably a closet organizer but they can be expensive and don't always fit the space you are trying to organize. If you rent, you may not be allowed or willing to invest in a closet organizer.
 

So, I came up with a list of ideas you can use to keep your closet organized - whether or not it is for clothes.

The first step, declutter. Donate any of the items you don't use anymore.
Check out our section on decluttering to help you get started.

The best way to store clothes and save space is by rolling them but from personal experience it is no easier to see what you have than when you stack the on top of each other. For this reason, I suggest folding them and placing vertically on a shelf or horizontally in a dresser. It makes it easy to see what you have and pull the item you want out, without wrecking the rest of your drawer.
 
 
Keep out of season attire away from your valuable drawer and closet space. Fold them up and store them in suitcases you rarely use, under the bed or in storage bins elsewhere in your home.
 
 
Always label bags and boxes containing the items you are storing. This will help you remember what is in the bins.
 
 
Use all of the space you have available. Even if your closet isn't a full walk-in or a walk-in at all, you can use the back of your door and the walls to hang additional shelves and hooks. My favourite temporary solutions are Command Hooks and items that suspend themselves by hooking or the top of the door, such as the purse hanger below. They can be used for purses, scarves, sporting equipment or really anything else that hangs or stacks.


To store your shoes, use a cabinet, shoe rack or door organizer to stack them and save valuable floor space. I like to throw an air freshener into cabinets, if that is my storage of choice, because shoes just don't smell good.

 
Use the new found floor space to store bins and suitcases with items that you don't need easy access to or only need seasonally. this doesn't only have to be clothes. I use bins and suitcases to store my scrapbook paper, memories and winter boots.
 
Use bins on your shelves - especially high ones. You can use these to organize your stuff but it also helps to get what you need without dropping everything from the top shelf onto the floor. If the shelf is placed far below the ceiling, use something with a lid so you can stack them or add additional shelves.


Again, I would label these bins because, it makes it a lot easier to remember what you put in there and helps you put stuff back in the right place without much thought.

Don't overstuff your closets. If you can't see it you will likely forget you have it and all it will do is take up valuable space. See if there is a better place for it or try to rehome it by giving it to someone, selling it or donating it.
Check out our article on what to do with your unwanted treasures.


Friday, 13 November 2015

Contact

If you would like to contact me outside of the blog for any reason including comments, questions and ideas email me at:

organizingsmallspaces@gmail.com

Or message me on the Organizing Small Spaces Facebook Page

Tuesday, 10 November 2015

Room by Room - Organizing your Kitchen

The next room in the Room by Room collection is the Kitchen.
 
There are some really great ideas out there for organizing your kitchen. Some require no handy skills at all and others much more. First we will talk about quick installs that will, at most, require a screwdriver or a hammer.
 
Don't use valuable cupboard space for your pots. Install a hanging pot rack. This will help increase the amount of space you have for items that are less attractive to display.
 
 
If you have a kitchen with almost enough room to have a table and chairs, ditch the table with a pedestal and chairs. Opt for a high table that's main support is on the outside and use stools. This way you can place the stools under the table when it is not in use, providing you with more space to walk around and an additional work space.
 
 
Add additional shelving space in your cupboards. This does not have to be as tedious as it sounds. Many stores have prefabricated shelves that either stand up on or hang from your current shelves. They can be found at Dollar Stores, Ikea and many other places.
 
 
Don't assume you have to use space for the expected purpose. A lot of people put their cleaning supplies under the sink but if this is premium space opt to use it for you appliances.
 
Like with the bathroom, use vertical space. Add shelving to bare walls to optimize the amount of storage you have in the kitchen. Use these shelves to store your cookbooks and your nice kitchenware. You can also install magnet strips for knives to optimize this space.


Install rails that you can hang baskets and hooks off of. These can be another great place to store items that usually take up valuable cupboard and drawer space.


Get rid of the junk drawer because it only gives you reason not to find a place for everything. If you have odds and ends that you know you use but don't really have another place to go, get a small storage container and place everything in the box in an inconspicuous area.
 
Use the space on the inside of your cabinet. The possibilities are endless. Add hooks to hang measuring utensils and cake decorating tips and cutters. Install holders to hang your spices or a magazine holder for storing aluminum foil and cling wrap.
 
 
Place similar cupboard items in baskets and other storage containers. For items like spices, it makes it much easier to pull out and find the ones at the back.
 
 
Add storage baskets to your fridge. Do this by gluing magnets to your choice of storage basket and use them for items such as spices and cookie cutters.


Use a file divider to store large flat items, such as cutting boards, upright. Or use them to stack frying pans in an accessible way.
 
 
Now for the more handy projects.
 
Make your drawers more functional by using drawer dividers. You can build your own or buy premade ones.
 
 
Pegboard is not just for shops and retail stores. Buy a sheet of pegboard, screw a one inch frame to the back, paint it a vibrant colour and use it to hang your kitchen wares on.
 
 
There is nothing I hate more than the faux drawers in front of the sink. I have actually, on more than one occasion, gone to someone's house and tried to open them only to realize that they are in fact fake. This trick will let you use this space to hide away every day items and declutter your counters.
 
 
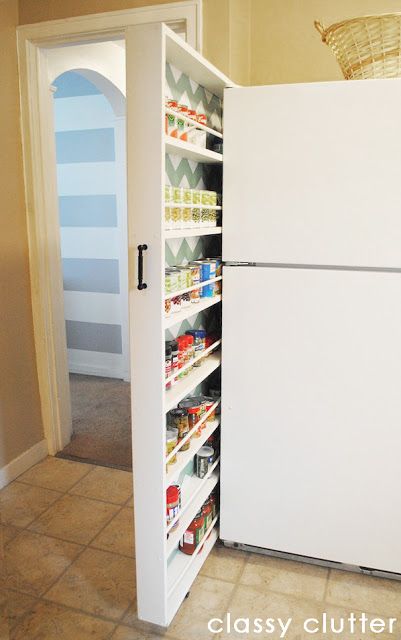
Create a rolling cabinet for the wasted space beside your appliances. Although you can build shelves to store food products, I am going to build one with a peg board back so that I can hang my Swiffer and broom in it. I am opting for peg board so that I have the freedom to rearrange it. When I do this project, I will be sure to post a DIY tutorial.
 

Share your kitchen ideas in the comments.